Quilt Piecing by Serger (BYOF) (Online) - 7/1/2021 1:00 PM - 4:00 PM

Online Classes

Quilt Piecing by Serger (BYOF) (Online)
Teacher: Alicia Welcher
 
Thursday, July 1, 2021
1:00 PM-4:00 PM
 
Code(s): Hands on Workshop
 
Online Class
 
Check at Expo for availability
 
Pricing Information
 
Price: $39.00

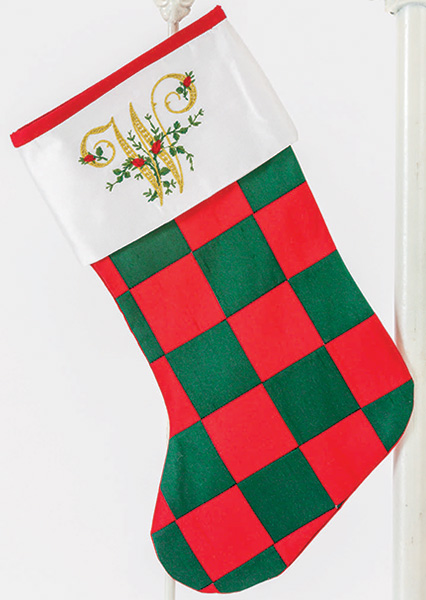
Come join us for Christmas in July and learn how easy it is to piece using your serger! While your sewing machine will always be the go-to machine for complex quilting designs, your serger is perfectly suited for simpler patterns such as the strip-pieced checkerboard pattern on this beautiful Christmas stocking, showcased in the 2019 Holiday issue of Classic Sewing magazine. The only trick is knowing how to achieve a 1/4" seam using your serger and Alicia will show you how! 


The machine-embroidery files for the monogram shown on the stocking cuff can be purchased from thesewingcollection.com/product/2019-embroidery-club/  It is part of The Embroidery Club 2019.


  • Student Maximum: 50
  • Category(ies): Rookies and Refreshers, Just for Fun, Gift Items, Experienced Sewers, Piecing Techniques, Experience the Serger
  • Experience Level: All welcome
  • Prerequisite: Basic Serger Knowledge
  • Advance Prep: Pattern and Instructions Preparation 
    • Print the pattern on regular 8.5x11 paper. The pattern can be found by click on the "File Link" in your Order Confirmation email.
    • Tape the pattern together, aligning the red dots around the outside of the pages. 
    • Cut the pattern out using paper scissors. 
    • Print the instructions or have them available to view on a device. If using a device, print page 6 (1/4 inch Seams) so that you can record your settings.


    2. Cutting 

    • Fabric A, cut the following: • Two strips, 2-1/2 inchx WOF • Two stockings using the Lining cutting line • One stocking using the Stocking cutting line b. From Fabric 
    • Fabric B, cut the following: • Cut two strips, 2-1/2 inch x WOF. 
    • Fabric C, cut the following: • One strip, 9 x 18 inch for embroidered cuff (Note: the silk dupioni used in the sample stocking needed to be fully hooped. If you are going to use a sticky stabilizer or temporary spray adhesive, your piece may not need to be this large) • One strip, 4-1/2 x 16 inch for cuff lining NOTE: If not embroidering the cuff, cut both strips 4-1/2 x 16 inch.  
    • Remove the selvages from all four 2-1/2 inch strips of fabric cut above and trim them to the same length, if needed. 


    3. Machine Embroidery The machine embroidery shown on the sample stocking is not a part of this class. 


    If you wish to embroider your stocking cuff and are planning to construct it during the class, please complete the embroidery prior to the class. Refer to the written instructions for embroidery placement on the cuff. The source for the pictured monogram embroidery is The Embroidery Club 2019 (https://www.thesewingcollection.com/product/2019-embroidery-club/). 


    4. Serger Setup a. Set the serger for a 3-thread narrow overlock with serger thread in the needle and both loopers (SL=2.5; W=6/3.5).

  • Supply List:
    • Serger, power cord and foot petal
    • Three fabrics for stocking and cuff as follows (silk dupioni was used for the original stocking, but quilt-weight cottons in either solids or prints would work great as well)
    • 5/8 yard of Fabric A for checkerboard, lining and back 
    • 1/4 yard of Fabric B for checkerboard 
    • 1/4 yard of Fabric C for cuff (1/8 yard if not embroidering the cuff)
    • 9 x 18 inch rectangle of fusible knit interfacing, such as Floriani Dream Weave (4-1/2 x 16 inch if not embroidering the cuff)
    • 1/4 yard of 1/4 inch wide double-faced satin or silk satin ribbon
    • 4 spools of serger thread to blend with fabrics
    • General Serging Supplies
  • Completion Level: Stocking parts completed; Possibly totally completed.
Thank you to these fine companies who provide continued support.